Solar: Difference between revisions
| Line 98: | Line 98: | ||
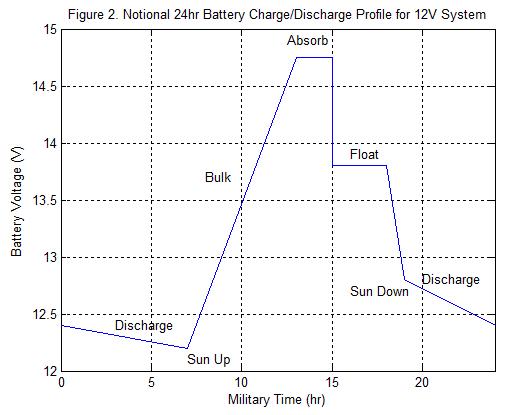
To get a feel for what the charge controller is doing over the period of a day, consider the notional floated lead acid battery voltage vs time curve shown in Figure 2. Time starts at midnight when the battery has already been discharging since sun down. The discharge continues until sun up when the solar panels once again start producing power. The charge controller attempts to recharge the battery as quickly as possible by routing all available power to the battery. This phase of the process is referred to as Bulk charging. As Bulk charging continues throughout the morning, the battery voltage slowly increases until the battery is roughly 100% charged. At this point the charge controller starts throttling back the power going into the battery by holding the voltage around 14.7-14.8V for floated lead acid batteries on a 70°F day. This stage is called Absorb and it's purpose is to slightly overcharge the battery. The Absorb phase helps insure all battery cells are fully charged and returns sulfites that have percipitated out of the solution back into solution. Absorb usually takes around 2 hrs, at which point the battery is fully charged and the charge controller drops the voltage to a level that allows the battery to remain fully charged. This is called the Float phase during which the charge controller attempts to supply all system power needs from the solar panels. It's no longer able to do this as the sun goes down and the battery once again starts discharging until sun up the next morning and the process starts all over. | To get a feel for what the charge controller is doing over the period of a day, consider the notional floated lead acid battery voltage vs time curve shown in Figure 2. Time starts at midnight when the battery has already been discharging since sun down. The discharge continues until sun up when the solar panels once again start producing power. The charge controller attempts to recharge the battery as quickly as possible by routing all available power to the battery. This phase of the process is referred to as Bulk charging. As Bulk charging continues throughout the morning, the battery voltage slowly increases until the battery is roughly 100% charged. At this point the charge controller starts throttling back the power going into the battery by holding the voltage around 14.7-14.8V for floated lead acid batteries on a 70°F day. This stage is called Absorb and it's purpose is to slightly overcharge the battery. The Absorb phase helps insure all battery cells are fully charged and returns sulfites that have percipitated out of the solution back into solution. Absorb usually takes around 2 hrs, at which point the battery is fully charged and the charge controller drops the voltage to a level that allows the battery to remain fully charged. This is called the Float phase during which the charge controller attempts to supply all system power needs from the solar panels. It's no longer able to do this as the sun goes down and the battery once again starts discharging until sun up the next morning and the process starts all over. | ||
[[File:Battery_Charge_Profile.jpg]] | |||
Now some folks may say they don't care about all this Bulk, Absorb and Float technical mumbo jumbo. They just want solar and will be glad to leave all that to the geeks. Well the unfortunate fact of the matter is when you install your system, the last step before flipping the switch on is that you'll be required to define for the controller what the Absorb and Float voltages you'd like it to use are. In addition, you'll also have to tell it how long to remain in Absorb among other things. So the manufacturer is assuming he sold his stuff to the geek and the geek will set it up properly. A word to the wise. Ya need to understand this if you're gonna do solar! | |||
One system that seemed to work plus '''[http://www.preparingyou.com/wiki/images/e/e6/Solar1.pdf solar wiring diagram]''': | One system that seemed to work plus '''[http://www.preparingyou.com/wiki/images/e/e6/Solar1.pdf solar wiring diagram]''': | ||
Revision as of 07:20, 25 December 2015
Solar has to do with the sun.
There are numerous ways to collect energy from the sun.
Solar Electric
No one does solar to beat the power company. Usually the reason someone puts in solar power is because they cannot get power in a particular place that needs some low voltage or they want some power that is renewable and reliable when there is nothing coming from the power company.
There is so much hype out there it is hard to tell what is the best deal. What would be nice is to find the best deals that makes the most sense for a particular need without having to become an electrical engineer or test two products we can't afford to find out we should have bought the third product we did not know about.
So much of our modern lives is dependent on electricity. What will we do when the power goes out for an extended period of time? Having even a little light when all other lights go out in the middle of winter could make a big difference in the mental state of a household. If part of your food preparations include frozen food, a backup source of power for the freezer could be very valuable. This article is intended to be an introduction to the possibilities of solar electricity for your household.
If you have questions about solar electric, sign up for the HHCPOWER Google group and post a question.
Terms and Definitions
Solar panel – creates electricity from sunlight
Charge Controller – uses electricity from solar panel to charge batteries. The charge controller protects the batteries by ensuring that the batteries are not overcharged
Inverter – Converts battery DC electricity to AC electricity that most appliances use
Electricity – the movement of electrons through a wire
- DC electricity – direct current electricity
- AC electricity – alternating current electricity
Volts – the force pushing the electrons
Amps – the amount of electrons moving through the wire
Watts – a unit that is a measure of electricity doing work in an instant of time. Watts is sometimes referred to as power.
- Watthour – one watt of electricity doing work for one hour
- Kilowatt hour – one thousand watts of electricity doing work for one hour. Your home electric bill says how many kilowatt hours you use each month.
A light bulb in your house may be rated at 100 watts. Burning that bulb for four hours uses 400 watthours or .4 kilowatt hours.
Basic Solar System
I consider a solar system one might use to live off grid in an RV to be the minimum most folks would want to live with. Such a system would only be able to power a few essentual items in most houses, but we lived in an RV for 4 yrs after we retired and the following system is what I'd recommend after learning several lessons the hard way. It's not exactly the system we have, but represents a cost effective design I wish we'd started with, rather than what we slowly evolved to via the school of hard knocks. Much of the information we learned along the way was care of Handy Bob Solar, who can be found on the web at http://handybobsolar.wordpress.com/.
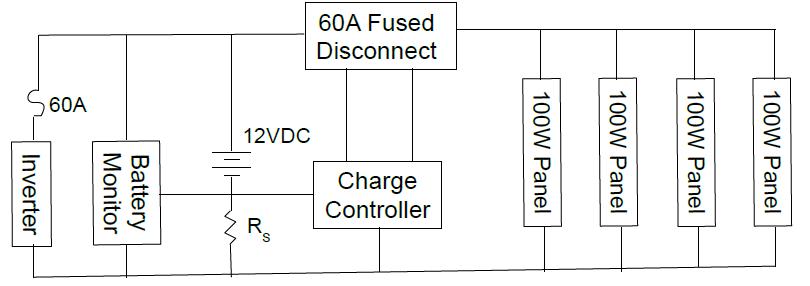
The electrical diagram for this system is shown in Figure 1 and is composed of the components listed in
Figure 1. Solar System Electrical Diagram
| PCs | Description | Price |
|---|---|---|
| 1pc | MorningStar SI-300-115V -UL SureSine 300W Inverter, 115V, 60Hz | $251 |
| 1pc | Morningstar TS-45 TriStar 45 Amp Charge Controller 12-48V PWM | $150 |
| 4pc | Windynation 100 Watt Polycrystalline 12V Solar Panel | $524 |
| 4pc | Trojan T-105 6V 225Ah Flooded Lead Acid GC2 Deep Cycle Battery | $600 |
| 1pc | Bogart Engineering Trimetric TM-2030-RV Battery Monitor System | $155 |
| 1pc | Bogart Engineering Deltec 500 amp, 50 millivolt current shunt | $27 |
| 1pc | Square D Pull-Out Disconnect Switch 60A Not Fusible - UFP222R | $26 |
| Total | $1733 |
Table 1. Recommended solar components, quantities and approximate cost
To understand how the system works, lets start with the 4 solar panels on the right side of the diagram. The way they are connected is pretty much dictated by the way the charge controller is designed and the battery voltage. The charge controller is of a PWM design, which stands for Pulse Width Modulation. That's a fancy way of saying the charge controller acts as an on/off switch for charging the batteries. When the battery voltage is low, it will be on most or all of the time. As the batteries become fully charged, the switch will be off most of the time only providing the power needed to keep the batteries in the fully charged or float condition. The 4 panels are each able to produce around 17-18VDC under no load condition, which is a good thing because more voltage might not be good for the batteries. They are connected in parallel with their positive terminal at the top of the diagram and negative terminal at the bottom, which acts as system ground. The positive lines are brought together in the disconnect which has two lines in and out. One side of the disconnect disconnects the solar panels from the charge controller while the other side disconnects the battery from the charge controller. This allows one to safely shut down battery charging for installation or maintainence. A fused disconnect provided additional protection, but I have to admit I'm currently using an unfused disconnect like the one listed in the table.
Battery charging is accomplished by current flowing out the left side of the disconnect into the battery, down through the shunt resistor, Rs and back into the solar panels. At first blush, putting a resistor in series with the battery might not sound like a very good idea. But the shunt resistor allows the charge controller and battery monitor to keep track of how much current is actually flowing through the battery. This allows them to determine the batteries current state of charge at all times in order to optimize battery charging. The shunt resistor is a very precise low resistance component, 0.0001Ω for those of a technical bent. Hence the charge controller and battery monitor has connections to both sides of the shunt resistor to measure the voltage drop across it. So the charge controller is basically acting as an on/off switch between the positve battery terminal and the positive solar panel terminal that uses battery voltage and current measurement to optimize battery charging.
The battery monitor is the human interface to the system telling one the battery voltage, battery current and percent of charge. Deep cycle batteries should never be discharged below 50% of their capacity if you want them to last a long time. So if your batteries are getting low, it might be a good idea to put your electic coffee pot away until they've been recharged. Many folks try to skimp on cost and not include a battery monitor. I can tell you from experience, this can be a costly mistake. Our RV system didn't have one initially and I wasn't able to tell that my batteries were being undercharged everyday and it only took me 2 yrs to kill a $600 set of batteries. But it actually turned out to be a blessing, as I met Handy Bob and put the system back together the way it should have been in the first place. That was in 2009 and it's still going strong today.
Inverters are connected to the positive battery terminal, through a 60A fuse which in this case is connected to the bottom of the shunt resistor. This allows the charge controller and battery monitor to keep track of the batteries current state of charge. The recommended inverter is a small 300W full sinewave invertor able to run a number of small loads. We used it 99% of the time to run our electronic gizmoses. However, if one intends to run large power devices like power tools, coffee makers or things in general requiring more than 300W a second high power invertor is required. Our RV has a 2000W inverter for this purpose that wasted an Amp or 2 just setting there doing nothing. The smaller inverer was an afterthough, but we could go for weeks without using the big one and wasting the Amps. It's also important to remember that inverters have a surge capability for starting thing that take a little extra power to get them going. The surge capability of the 300W inverter is 600W, for a short period of time, which is why the fuse protecting it is 60A. The fuse has to be able to handle the surge.
To get a feel for what the charge controller is doing over the period of a day, consider the notional floated lead acid battery voltage vs time curve shown in Figure 2. Time starts at midnight when the battery has already been discharging since sun down. The discharge continues until sun up when the solar panels once again start producing power. The charge controller attempts to recharge the battery as quickly as possible by routing all available power to the battery. This phase of the process is referred to as Bulk charging. As Bulk charging continues throughout the morning, the battery voltage slowly increases until the battery is roughly 100% charged. At this point the charge controller starts throttling back the power going into the battery by holding the voltage around 14.7-14.8V for floated lead acid batteries on a 70°F day. This stage is called Absorb and it's purpose is to slightly overcharge the battery. The Absorb phase helps insure all battery cells are fully charged and returns sulfites that have percipitated out of the solution back into solution. Absorb usually takes around 2 hrs, at which point the battery is fully charged and the charge controller drops the voltage to a level that allows the battery to remain fully charged. This is called the Float phase during which the charge controller attempts to supply all system power needs from the solar panels. It's no longer able to do this as the sun goes down and the battery once again starts discharging until sun up the next morning and the process starts all over.
Now some folks may say they don't care about all this Bulk, Absorb and Float technical mumbo jumbo. They just want solar and will be glad to leave all that to the geeks. Well the unfortunate fact of the matter is when you install your system, the last step before flipping the switch on is that you'll be required to define for the controller what the Absorb and Float voltages you'd like it to use are. In addition, you'll also have to tell it how long to remain in Absorb among other things. So the manufacturer is assuming he sold his stuff to the geek and the geek will set it up properly. A word to the wise. Ya need to understand this if you're gonna do solar!
One system that seemed to work plus solar wiring diagram:
Installation Guidelines and Considerations
The two technical things we discovered is solar is a low voltage and high current application where large gauge wire is needed. The other do not undercharge your batteries. Battery manufactures will tell you at least 14.7-14.8V is required to charge a 12V battery.
There is a solar guy, Bob, who actually made a full time business out of fixing the messes created byother installers using poor practices and bad component choices.
In addition to fixing our wiring problem he identified our charge controller as the principle problem in our system He's actually done the kind of experimentation and research to figure out what the reliable, cost effective components one should use. That was 6 years ago and we're still using the same RV setup with the batteries we had to replace going strong.
What to do when the Sun don't Shine
Home Sized Solar System
Solar System Sizing
P3 P4400 Kill A Watt Electricity Usage Monitor - The cheapest watt of electricity is the one you never use. Before building a solar system, make sure you have energy efficient appliances. It will be cheaper to upgrade an appliance then to build a solar system to handle inefficient appliances. The best way to determine how much electricity an appliance is using is with a Kill a Watt Electricity Usage Monitor
Plug the Kill a Watt into the wall outlet, plug appliance into the Kill a Watt. Let it run for about a week, the length of time does not have to be exactly one week, just needs a long period of time. At the end of one week push the right red button. It toggles between kilowatt hours and time. The time is in hours. Divide the kilowatt hours by the time and multiply by 24 to get average kilowatt hours per day for that appliance. Do this for each appliance you may want to power with solar.
Manage the usage - This is a humorous example of the importance of managing electric use when you have a limited source. http://www.imdb.com/video/hulu/vi2444560153/?ref_=tt_ov_vi
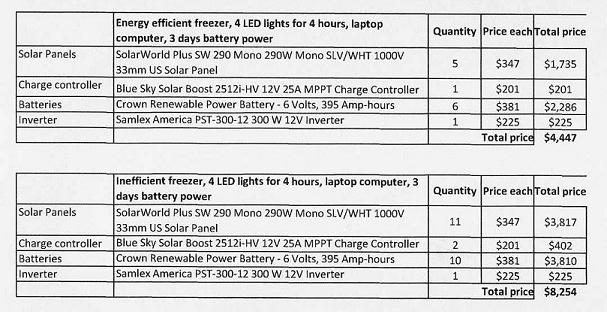
A energy efficient chest freezer uses about .7 kilowatt hours per day. Four 9 watt LED lights used four hours will use about .3 kilowatt hours per day. My laptop computer uses about .7 kilowatt hours per day. The inefficient freezer uses about 2.4 kilowatt hours per day.
The following are the components used in these examples to build a small 12 volt solar system. The price estimates do not include a frame for the solar panels, wires, breakers, combiner box, battery box and connectors.
Solar panels - SolarWorld Plus SW 290 Mono 290W Mono SLV/WHT 1000V 33mm US Solar Panel $347 each
Charge controller - Blue Sky Solar Boost 2512i-HV 12V 25A MPPT Charge Controller $201 each
http://www.civicsolar.com/product/blue-sky-solar-boost-2512i-hv-12v-25a-mppt-charge-controller
Batteries - Crown Renewable Power Battery - 6 Volts, 395 Amp-hours $381 each
Inverter - Samlex America PST-300-12 300 W 12V Inverter $225 each
http://www.civicsolar.com/product/samlex-america-pst-300-12-300-w-12v-inverter
Batteries are the most expensive part of the system. Solar panels keep getting cheaper over time but unfortunately batteries do not. Batteries are needed for night time and for cloudy days. These estimates assume that there will be at most three cloudy days in a row. That is the minimum. Allowing for more cloudy days would require more batteries and more solar panels to charge the additional batteries.
The following spreadsheets are to give you a ballpark idea of the costs. They are not meant to be complete systems. Consult an experienced person before you take the plunge into solar.
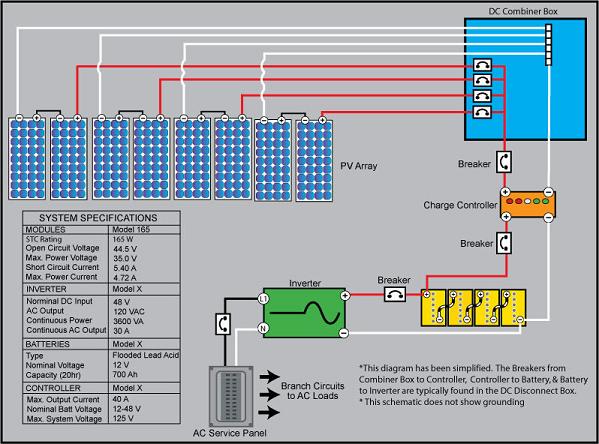
The following diagram shows the wiring of a sample 48 volt solar electric system. It is not based on the components listed above but is intended to show how solar electric system components are connected.


